# ESP Secure Cert OTA Example
This example demonstrates how to perform OTA (Over-The-Air) updates on the `esp_secure_cert` partition in ESP-IDF. The example shows three different OTA strategies:
1. **Use Unallocated Space** - Find unallocated flash space for staging
2. **Use Passive OTA Partition** - Use the passive OTA app partition for staging
3. **Direct OTA** - Update directly without staging (This is not recommended as this can be risky)
## Overview
The `esp_secure_cert` partition stores device certificates and private keys. Updating this partition requires careful handling to prevent bricking the device. This example demonstrates three different approaches with varying levels of safety and resource requirements.
## OTA Modes
This example demonstrates three OTA methods that differ in their staging area approach: using unallocated flash space, using the passive OTA app partition, or writing directly to the original partition.
### Fail-safe mechanism
To make the OTA fail-safe, user can store the staging partition information on the flash (like NVS in example case). And if the power interrupt occurs, user can read staging area information and set that partition using API `esp_secure_cert_tlv_set_partition`. This API is to set the partition from which data should be read. If `NULL` is passed to this API, it will start reading from the original partition.
**NOTE - This API, before setting any partition, unmaps the previously set partition internally. So if any esp_secure_cert API returned any pointer(s), they can be invalid after the usage of this API**
```c
// Example: Set staging partition to read certificate data during recovery
const esp_partition_t *staging_partition = /* recovered staging partition */;
// Set the partition to read from the staging area instead of the default primary partition
esp_err_t err = esp_secure_cert_tlv_set_partition(staging_partition);
if (err != ESP_OK) {
ESP_LOGE(TAG, "Failed to set staging partition");
return err;
}
// Now all esp_secure_cert read APIs will use the staging partition
// This allows verification before copying to the primary partition
// After successful copy to primary partition, reset to use default partition
esp_secure_cert_tlv_set_partition(NULL);
```
### 1. Use Unallocated Space (Recommended)
**Config:** `CONFIG_EXAMPLE_ESP_SECURE_CERT_OTA_USE_UNALLOCATED_SPACE`
This mode finds unallocated space in flash and uses it as a staging area.
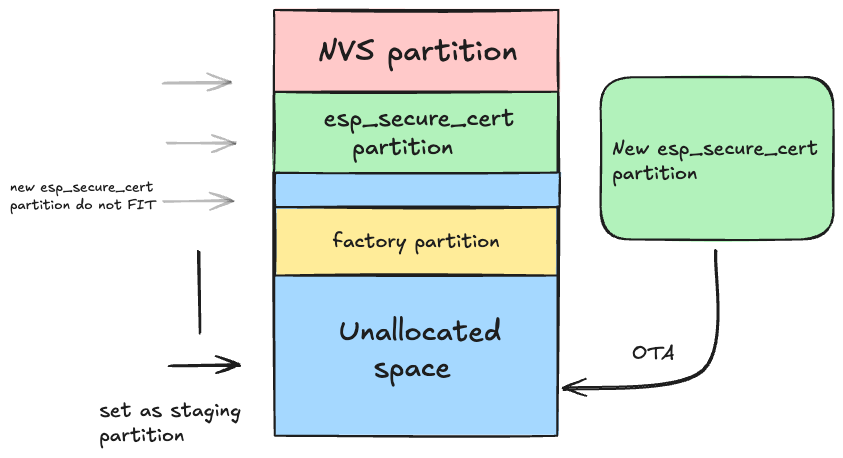
**How it works:**
- Scans flash partition table to find gaps between partitions
- Uses unallocated space as staging area for download
- Saves staging offset in NVS after completing download
- If interrupted, can resume on next boot (by reading the data from the NVS stored offset)
- After successful download, copies staging to original partition
- Clears NVS entry after successful copy
**Advantages:**
- Safe: Original partition untouched during download
- Rollback capable: Interrupted downloads don't corrupt original
**Requirements:**
- Requires unallocated flash space ≥ esp_secure_cert partition size
- NVS partition for tracking staging state
### 2. Use Passive OTA Partition
**Config:** `CONFIG_EXAMPLE_ESP_SECURE_CERT_USE_PASSIVE_OTA`
This mode uses the passive OTA app partition as staging area.
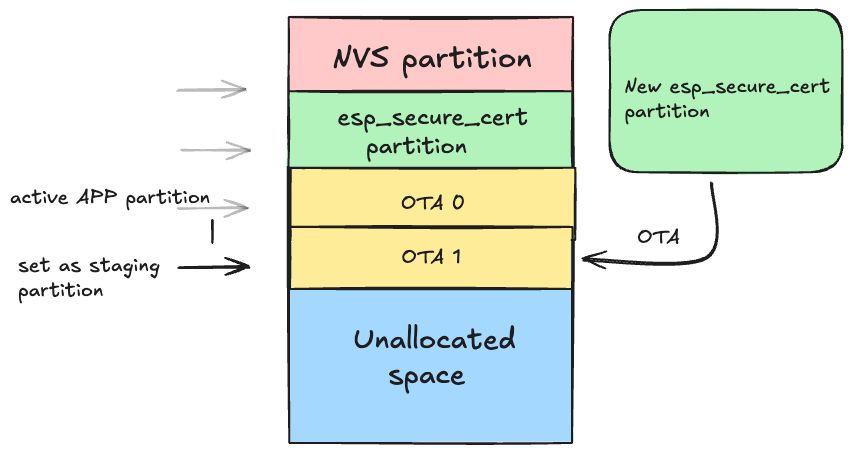
**How it works:**
- Finds the passive (non-running) OTA partition
- Validates that partition has no valid app image
- Uses it as staging area for download
- Saves staging offset in NVS after completing the download
- If interrupted, can resume on next boot (by reading the data from the NVS stored offset)
- After successful download, copies to original partition
- Clears NVS entry after successful copy
**Advantages:**
- Safe: Original partition untouched during download
- Rollback capable: Interrupted downloads don't corrupt original
- No additional flash space needed
**Requirements:**
- OTA partition must be large enough to store the esp_secure_cert partition
- OTA partition must not have valid app image
- NVS for storing staging partition information
### 3. Direct OTA (Not Recommended)
**Config:** `CONFIG_EXAMPLE_ESP_SECURE_CERT_DIRECT_OTA`
This mode writes directly to the original partition without staging.
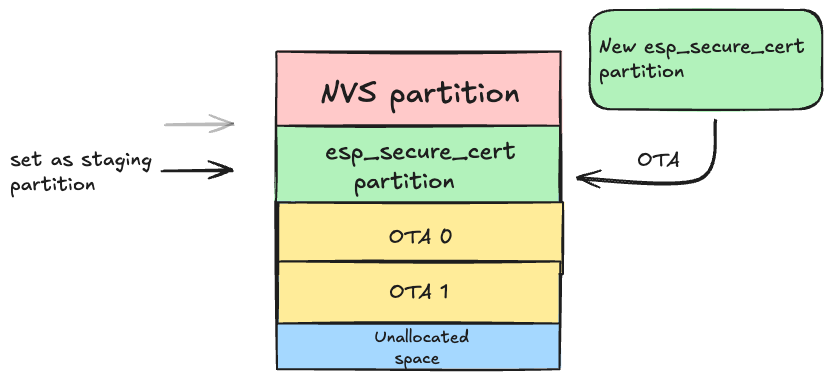
**How it works:**
- Erases original partition
- Writes new data directly
- No staging, no NVS tracking
**Advantages:**
- Simple implementation
- No additional flash space needed
- No NVS overhead
**Disadvantages:**
- **DANGEROUS**: Interruption will corrupt partition
- No rollback capability
**Use only if:**
- You have no unallocated space
- You cannot use passive OTA partition
- You have a custom recovery mechanism
## How to Use
**NOTE:** This example requires an OTA server hosting the new `esp_secure_cert` partition binary. You can use any HTTP/HTTPS server (e.g., a simple Python HTTPS server) to serve the binary for the OTA update.
### 1. Set Target Chip
```bash
idf.py set-target esp32c3 # or esp32, esp32s2, esp32s3, etc.
```
### 2. Configure OTA Mode
Configure the OTA mode using menuconfig:
```bash
idf.py menuconfig
```
Navigate to: `ESP Secure Cert OTA Example Configuration` → `ESP Secure Cert OTA Mode`
Select one of:
- **Use Unallocated Space** (default)
- **Use Passive OTA Partition**
- **Direct OTA**
### 3. Generate the esp_secure_cert Partition Binary
The `esp_secure_cert` partition binary must be generated using the [provisioning tool](../../tools/README.md) included in this component. This is the same binary that will be hosted on the OTA server for remote updates.
**Generate the initial partition (for flashing during manufacturing):**
```bash
python configure_esp_secure_cert.py \
--ca-cert ca_cert.pem \
--device-cert device_cert.pem \
--private-key device_key.pem \
--target_chip esp32c3 \n
```
This is output esp_secure_cert partition binary with name `esp_secure_cert.bin`.
Host `esp_secure_cert.bin` on your HTTPS server and configure `CONFIG_EXAMPLE_FIRMWARE_UPGRADE_URL` to point to it.
**NOTE - While generating partition, at the end of partition automatically `ESP_SECURE_CERT_INTEGRITY_TLV` TLV will be appended**
See the [tools README](../../tools/README.md) for full details on all provisioning tool options.
### 4. Flash the Initial Partition
```bash
# Flash the initial partition during manufacturing
esptool.py --chip esp32c3 -p /dev/ttyUSB0 write_flash 0xF000 esp_secure_cert.bin
```
### 5. Build and Flash the Application
Build the project and flash it:
```bash
idf.py build
idf.py -p /dev/ttyUSB0 flash monitor
```
To create a project from this example, run:
idf.py create-project-from-example "espressif/esp_secure_cert_mgr=2.9.2:esp_secure_cert_ota_example"