uploaded 3 years ago
A lite version Wi-Fi Mesh, each node can access the network over the IP layer.
readme
- [中文版本](https://github.com/espressif/esp-mesh-lite/blob/master/components/mesh_lite/README_CN.md)
# ESP Wi-Fi Mesh Lite
This document provides an introduction to the Mesh-Lite protocol.
## Overview
ESP-MESH-LITE is a Wi-Fi networking application of [IoT-Bridge](https://github.com/espressif/esp-iot-bridge), based on the **SoftAP + Station** mode, a set of Mesh solutions built on top of the Wi-Fi protocol. ESP-MESH-LITE allows numerous devices (henceforth referred to as nodes) spread over a large physical area (both indoors and outdoors) to be interconnected under a single WLAN (Wireless Local-Area Network). The biggest difference between ESP-MESH-LITE and [ESP-MESH](https://docs.espressif.com/projects/esp-idf/en/v5.0/esp32/api-guides/esp-wifi-mesh.html) (also known as ESP-WIFI-MESH) is that ESP-MESH-LITE allows sub-devices in the network to independently access the external network, and the transmission information is insensitive to the parent node, which greatly reduces the difficulty to develop the application layer. ESP-MESH-LITE is self-organizing and self-healing, which means the network can be built and maintained autonomously.
This ESP-MESH-LITE guide contains the following sections:
1. [Introduction](#1)
2. [Concept of ESP-MESH-LITE](#2)
3. [Establish Network](#3)
4. [Manage Network](#4)
5. [Data Transmission](#5)
6. [Performance](#6)
7. [Difference between ESP-MESH-LITE and ESP-MESH](#7)
7. [Migration Guides](#8)
8. [Further Notes](#9)
## <span id = "1">Introduction</span>
ESP-Mesh-Lite is supported by various Espressif chips, as shown in the table below:
| Chip | ESP-IDF Release/v4.4 | ESP-IDF Release/v5.0 |
| -------- | ------------------------------------------------------------ | ------------------------------------------------------------ |
| ESP32 | [](https://camo.githubusercontent.com/bd5f5f82b920744ff961517942e99a46699fee58737cd9b31bf56e5ca41b781b/68747470733a2f2f696d672e736869656c64732e696f2f62616467652f2d737570706f727465642d677265656e) | [](https://camo.githubusercontent.com/bd5f5f82b920744ff961517942e99a46699fee58737cd9b31bf56e5ca41b781b/68747470733a2f2f696d672e736869656c64732e696f2f62616467652f2d737570706f727465642d677265656e) |
| ESP32-C3 | [](https://camo.githubusercontent.com/bd5f5f82b920744ff961517942e99a46699fee58737cd9b31bf56e5ca41b781b/68747470733a2f2f696d672e736869656c64732e696f2f62616467652f2d737570706f727465642d677265656e) | [](https://camo.githubusercontent.com/bd5f5f82b920744ff961517942e99a46699fee58737cd9b31bf56e5ca41b781b/68747470733a2f2f696d672e736869656c64732e696f2f62616467652f2d737570706f727465642d677265656e) |
| ESP32-S2 | [](https://camo.githubusercontent.com/bd5f5f82b920744ff961517942e99a46699fee58737cd9b31bf56e5ca41b781b/68747470733a2f2f696d672e736869656c64732e696f2f62616467652f2d737570706f727465642d677265656e) | [](https://camo.githubusercontent.com/bd5f5f82b920744ff961517942e99a46699fee58737cd9b31bf56e5ca41b781b/68747470733a2f2f696d672e736869656c64732e696f2f62616467652f2d737570706f727465642d677265656e) |
| ESP32-S3 | [](https://camo.githubusercontent.com/bd5f5f82b920744ff961517942e99a46699fee58737cd9b31bf56e5ca41b781b/68747470733a2f2f696d672e736869656c64732e696f2f62616467652f2d737570706f727465642d677265656e) | [](https://camo.githubusercontent.com/bd5f5f82b920744ff961517942e99a46699fee58737cd9b31bf56e5ca41b781b/68747470733a2f2f696d672e736869656c64732e696f2f62616467652f2d737570706f727465642d677265656e) |
| ESP32-C2 | *N/A* | TODO |
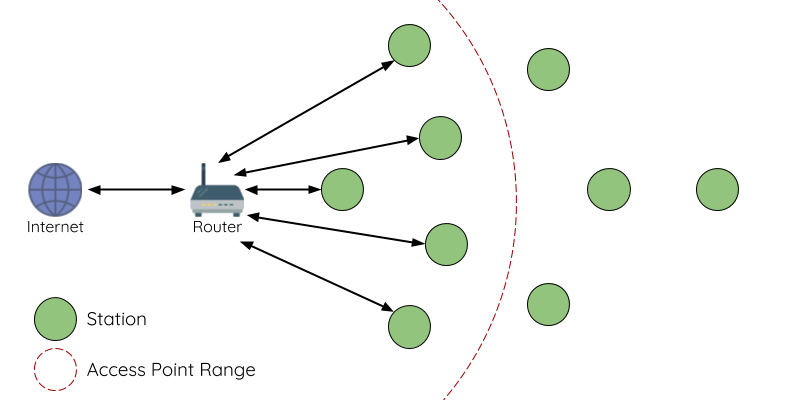
<center>Traditional Wi-Fi Network Architecture</center>
A traditional Wi-Fi network is a "point-to-multipoint" network. The central node of this type of network architecture is the access point (AP), and the other nodes (stations) are directly connected to the AP. AP handles the arbitration and forwarding between stations, and some APs also exchange data with external IP networks through routers. In a traditional Wi-Fi network architecture:
1. The coverage area is relatively limited as all stations must connect to AP directly and thus cannot be too far away from AP.
2. The number of stations allowed in the network is relatively limited due to the limitation of AP capacity, which makes it vulnerable to overload.
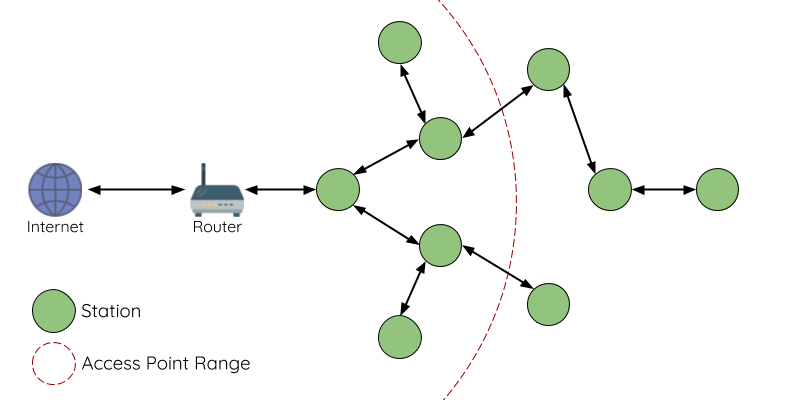
<center>ESP-MESH-LITE Network Architecture</center>
The difference between ESP-MESH-LITE and traditional Wi-Fi networks is that the nodes in ESP-MESH-LITE do not need to be connected to a central node, but can be connected to neighboring nodes. Each node is responsible for data forwarding of adjacent nodes through Wi-Fi connection. Without being limited by the distance to the central node, the ESP-MESH-LITE network is able to cover a wider area. Similarly, without being limited by the capacity of the central node, ESP-MESH-LITE allows more connections and is less prone to overload. At the same time, each node gets an IP address assigned by the parent node, hence accessing the network in the same way a single device accesses a router. During the process, the parent node only forwards this data on the network layer and ignores the application layer.
## <span id = "2">Concept of ESP-MESH-LITE</span>
### Term
| Term | Description |
| -------- | ------------------------------------------------------------ |
| Node | Any device that is **part of** or **can be part of** the ESP-MESH-LITE network |
| Root Node | Nodes at the top of the network |
| Child Node | If node X is connected to node Y and X travels more layers to the root node than Y, then X is said to be a child of Y |
| Parent Node | Opposite to child node |
| Descendant Node | Any node that can be traced from the root node |
| Sibling Node | All nodes connected to the same parent node |
| Connection | Traditional Wi-Fi association between AP and station. Nodes in ESP-MESH-LITE use the station interface to associate with the SoftAP interface of another node, thus establishing a connection. The connection includes the authentication and association process in the Wi-Fi network |
| Upstream Connection | Connection from a node to its parent node |
| Downstream Connection | Connection from a parent node to one of its child nodes |
| Subnetwork | Part of the ESP-MESH-LITE network that includes a node and all its descendant nodes. Thus, the root node's subnetwork includes all nodes in the ESP-MESH-LITE network |
### Tree Topology
ESP-MESH-LITE is based on the traditional Wi-Fi protocol and can be regarded as a provisioning protocol that combines multiple independent Wi-Fi networks into a single WLAN network. In a Wi-Fi network, a station is limited to a single connection to an AP at any given time (upstream connection), while an AP can connect to multiple stations at the same time (downstream connection). However, the ESP-MESH-LITE network allows a node to act as both station and AP, so a node in ESP-MESH-LITE can establish **multiple downstream connections using its SoftAP interface** and **one upstream connection using its station interface**. This will naturally result in a tree network topology consisting of multiple layers of parent-child structures.
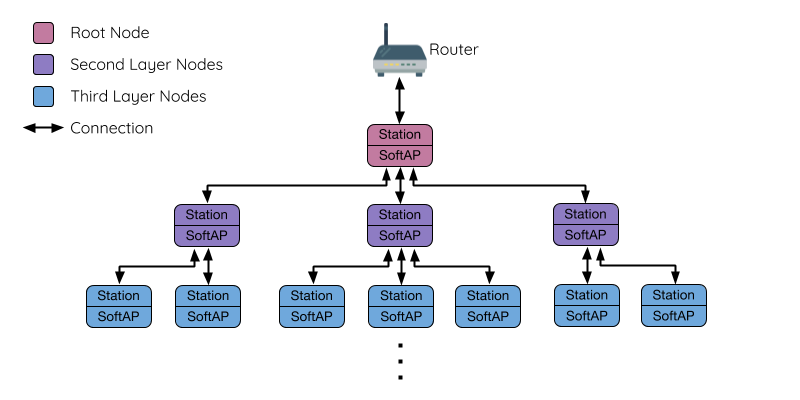
<center>ESP-MESH-LITE Tree Topology</center>
Each node in ESP-MESH-LITE is assigned an IP address by its parent node to communicate directly with the external network. Thus, the communication data of this node would never affect the parent node.
**Notes**
The total number of nodes in ESP-MESH-LITE depends on the maximum number of layers allowed and the maximum number of downstream connections that each node can have in the network. Therefore, these two variables can be used to configure the size of the ESP-MESH-LITE network.
>The maximum number of layers allowed in the network: 1-16
>
>The maximum number of downstream connections that each node can have: 1-10
### Node Type
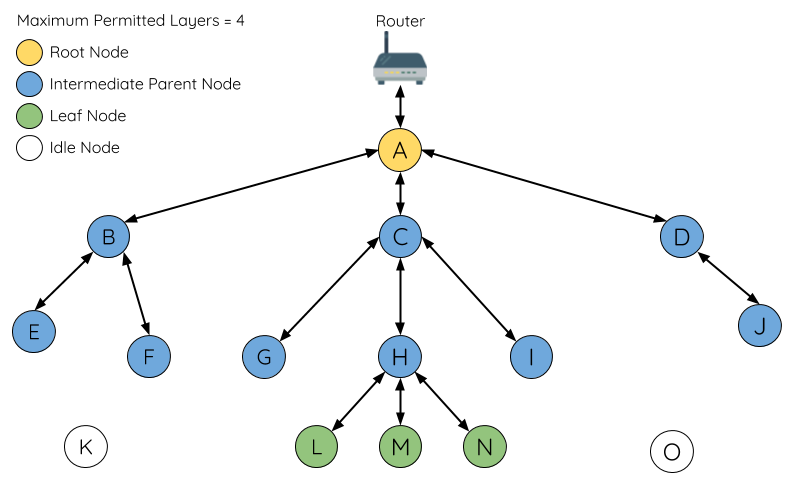
<center>ESP-MESH-LITE Node Type</center>
**Root Node**: Nodes at the top of the network, which serve as the only interface between the ESP-MESH-LITE network and the external IP network. The Root Node connects directly to the traditional Wi-Fi router and acts as a bridge between the nodes of the ESP-MESH-LITE network and the external IP network. **Normally, there can only be one root node in an ESP-MESH-LITE network**, and the root node's upstream connection can only be to a router. As shown in the figure above, Node A is the root node of this ESP-MESH-LITE network.
**Leaf Node**: Nodes that are not allowed to have any child nodes (i.e., no downstream connections). If a node is on the maximum allowed layer of the ESP-MESH-LITE network, the node will become a leaf node. Leaf nodes do not generate further downstream connections, ensuring that the network layers will not exceed the limit. Since the SoftAP interface is required to establish downstream connections, some nodes with station interface only will also be assigned as leaf nodes. As shown in the figure above, the L/M/N nodes on the outermost layer of the network are the leaf nodes.
**Intermediate Parent Node**: A node that is neither a root nor a leaf node is an intermediate parent node. An intermediate parent node must have one and only one upstream connection (i.e., one parent node), yet can have zero or more downstream connections (i.e., zero or more child nodes). Therefore, an intermediate parent node can send and receive its own packets, as well as forward packets from its upstream and downstream connections. As shown in the figure above, nodes B to J are intermediate parent nodes. **Note that intermediate parent nodes such as E/F/G/I/J without downstream connections are not equivalent to leaf nodes**, as these nodes are still allowed to establish downstream connections.
**Idle Node**: A node that has not yet joined the network is considered an idle node. An idle node will attempt to establish an upstream connection with an intermediate parent node, or become a root node if available (see [Automatic Root Node Selection](#Automatically_select_the_root_node)). As shown in the figure above, K and O are idle nodes.
### <span id = "Beacon">Beacon Frame</span>
Each node in ESP-MESH-LITE that can establish a downstream connection (i.e., a node that has a SoftAP interface) transmits Wi-Fi beacon frames periodically. Through the beacon frames, the node allows other nodes to detect its presence and status. The idle node will listen for beacon frames to generate a list of potential parent nodes and form an uplink connection with one of the potential parent nodes. ESP-MESH-LITE uses "Vendor Information Elements" to store metadata, such as:
- Mesh-Lite version number
- The current layer of the node
- Current number of child nodes
- The maximum number of downstream connections allowed
### <span id = "Preferred_parent_node">Preferred Parent Node</span>
When an idle node has multiple candidate parent nodes (potential parent nodes), the idle node will establish an upstream connection with one of the **preferred parent nodes**. The preferred parent node is determined based on the following conditions:
- The layer of the candidate parent node
- Signal strength of the candidate parent node
Candidate parent nodes (including the root node) on the higher layer in the network will have priority to become the preferred parent node. This helps to control the total number of layers in the ESP-MESH-LITE network to a minimum when establishing upstream connections. For example, when choosing between candidate parent nodes on the second layer and the third layer, the candidate parent node on the second layer will always take precedence as the preferred parent unless the RSSI strength of the candidate parent node on the second layer is below a preset threshold.
If more than one candidate parent node exists on the same layer, the one with the highest RSSI strength will be the preferred parent node.
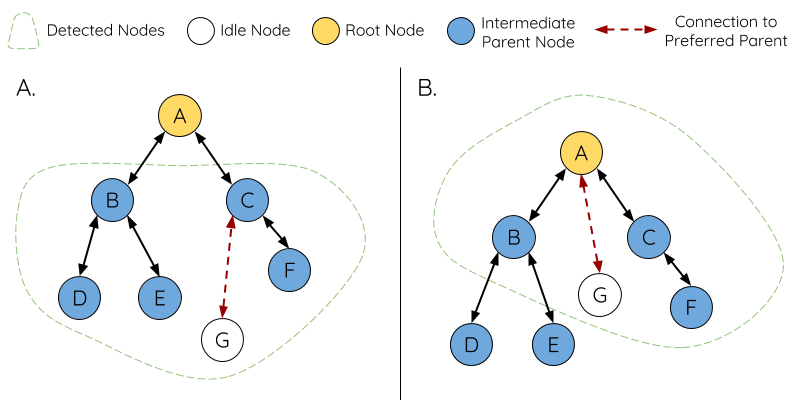
<center>Preferred Parent Node Selection
**Part A of the above figure** shows how the idle node G chooses the preferred parent node among the five candidate parent nodes B/C/D/E/F. First, B/C are better than D/E/F as these two nodes are on a higher layer. Secondly, C is preferred over B as C is closer to G with a stronger RSSI signal.
**Part B of the above figure** shows how the idle node G chooses the preferred parent node among the root node A and other candidate parent nodes. At this time, root node A is within the range of idle node G (i.e., idle node G receives root node A beacon frame with RSSI strength higher than the preset threshold). Since the root node A is on the highest layer in the network, it will be the preferred parent node.
**Notes**
Users can also define which layers are fixed or disabled for the selected nodes through `esp_mesh_lite_set_allowed_level` and `esp_mesh_lite_set_disallowed_level` (see [Mesh-Lite API Reference](https://github.com/espressif/esp-mesh-lite/blob/master/components/mesh_lite/include/esp_mesh_lite_core.h)).
## <span id = "3">Establish Network</span>
### General Process
Warning
Before ESP-MESH-LITE officially starts building the network, please ensure that all nodes in the network share the same configuration (see [`esp_mesh_lite_config_t`](https://github.com/espressif/esp-mesh-lite/blob/master/components/mesh_lite/include/esp_mesh_lite_core.h)). Each node must be configured with **the same MESH_LITE network ID, maximum number of layers, and SoftAP**.
The ESP-MESH-LITE network will first select the root node and then establish downstream connections layer by layer until all nodes have joined the network. The layout of the network may depend on factors such as root node selection, parent node selection, and asynchronous power-up reset. But in short, the process of building an ESP-MESH-LITE network can be summarized in the following steps:
<center>ESP-MESH-LITE Network Building Process
#### 1. Root Node Selection
The root node is specified directly (see [User Specifies the Root Node](#Specify_the_root_node)) or is determined by fusion (see [Automatic Root Node Selection](#Automatically_select_the_root_node)). Once selected, the remaining nodes start connecting to the root node and establishing the upstream connection.
#### 2. Forming the Second Layer
Once the root node is connected to the router, the remaining nodes within range of the root node and the following powered-up nodes of the same configuration will scan for the root node (only if the root node does not reach the maximum number of connections. If the maximum number of connections is reached, the node will select a higher-level node as its preferred parent node), thereby forming the second layer of the network. Once connected, the nodes on the second layer become intermediate parent nodes (assuming the maximum layer allowed is greater than two), and in turn form the next layer. As shown in the figure above, node B to node D are within the connectivity of the root node. Therefore, node B to node D will establish upward connections to the root node and become intermediate parent nodes.
#### 3. Forming the Remaining Layers
The remaining idle nodes will be connected to the intermediate parent nodes within their range and form a new layer. Once connected, the idle nodes become intermediate parent or leaf nodes depending on the maximum number of layers allowed in the network. The process is repeated thereafter until all the idle nodes join the network or reach the maximum number of layers allowed in the network. As shown in the figure above, nodes E/F/G are connected to nodes B/C/D, respectively, becoming intermediate parent nodes.
#### 4. Limit Tree Depth
To prevent the network from exceeding the maximum number of layers allowed, the nodes on the maximum layer will become leaf nodes after connected. In this way, other idle nodes will not be able to establish connections with the leaf nodes on this maximum layer and therefore will not exceed the maximum number of layers allowed. However, if the idle node is unable to find other potential parent nodes, it will remain idle indefinitely. As shown in the figure above, the maximum number of layers allowed in the network is four. Therefore, node H will become a leaf node after connected to prevent any further downstream connection.
### <span id = "Automatically_select_the_root_node">Automatic Root Node Selection</span>
In automatic mode, the selection of the root node depends on the signal strength relative to the router.
ESP-MESH-LITE regards the first powered-up device as the root node by default. If there are multiple devices powered up at the same time, after connecting to the configured Wi-Fi router, each device will send an advertising broadcast to the router with its own MAC address and router RSSI value. **The MAC address can represent a unique node in the network**, while the **router RSSI value** represents the signal strength relative to the router.
After all Mesh-Lite devices (with the same Mesh-Lite ID) connected to the same router receive a broadcast forwarded by the router, if the node detects a broadcast with a stronger router RSSI, it stops broadcasting, i.e. **"abort selection"**. After a certain waiting time (default 10 s), all devices that abort selection will be disconnected from the router, re-scanning for potential parent nodes and selecting the preferred parent node to establish upstream connections (i.e., connecting to the root node as a secondary node, and if the secondary node reaches full capacity, the corresponding will act as a tertiary node).
**Notes**
- This solution also resolves root node conflicts. If devices of the same configuration are connected to the same router (manually specified or accidentally connected) after the Mesh-Lite network connection is successfully established, the root node conflict will also be resolved in this way.
- If you want to prevent many devices from connecting to the router at the same time, it is recommended to stagger the power-up time of the child nodes and the root node, and wait for the root node to be successfully powered up before powering up the child nodes in large quantities, so that the child nodes can discover the root node and establish connections in time.
The following figure illustrates the automatic root node selection process in an ESP-MESH-LITE network.
<img src="./docs/_static/root_node_election.png" style="zoom: 50%;" />
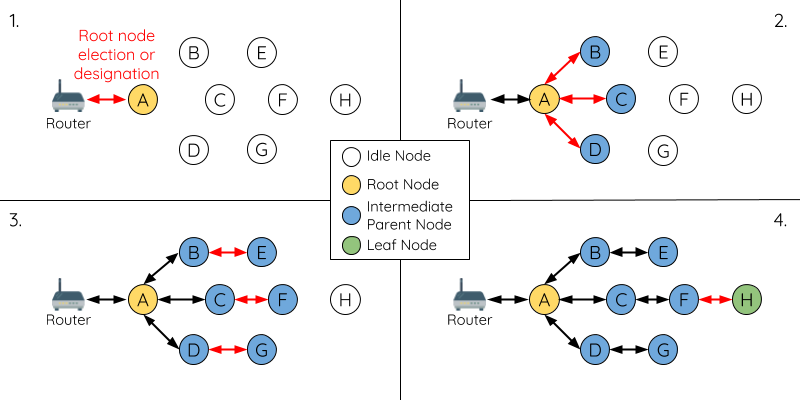
<center>Examples of Root Node Selection
**1.** Node A/B/C are connected to the router after powering up at the same time. After advertising, it turns out that node C has the strongest router RSSI value (-10 dB).
**2.** Node A/B disconnect from the router and re-scan for potential parent nodes. Node C becomes the preferred parent of Node A/B and connects to them. Node A/B will form the second layer of the network.
**3.** When node D/E are powered up, they first scan for the presence of potential parent nodes, and node C will become the preferred parent (i.e., the node on the highest layer) of node D/E and connect to these nodes. Nodes A/B/D/E will form the second layer of the network.
**4.** Node F and node G connect node D and node E, respectively, and complete the network building process.
### <span id = "Specify_the_root_node">User Specifies the Root Node</span>
The root node can also be specified by the user, which means that the specified root node can be directly connected to the router. When the root node is specified, if there are nodes that are also connected to the router, they will actively disconnect and go to a new parent node to prevent root node conflicts. The following figure shows the manual selection process of the root node in an ESP-MESH-LITE network.
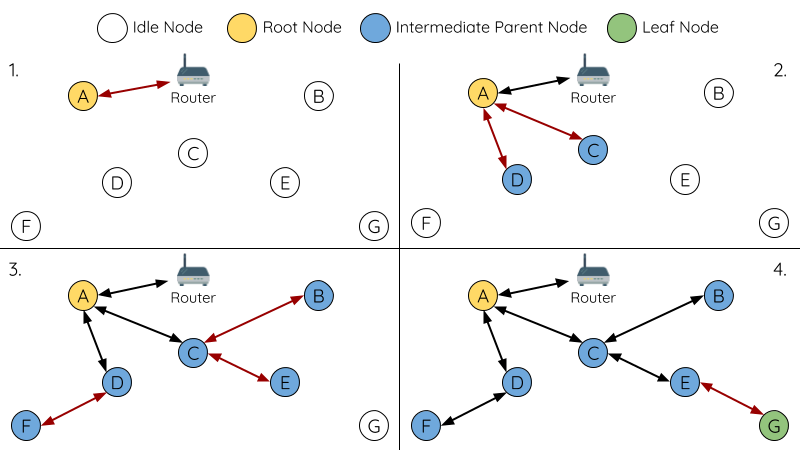
<center> Examples of Root Node Specification (root node = A, maximum layer allowed = 4)
**1.** Node A is the user-specified root node and is therefore directly connected to the router.
**2.** Node C and Node D select Node A as their preferred parent node and establish connections to it. These two nodes will form the second layer of the network.
**3.** Similarly, node B and node E scan for a suitable parent node, node C, and will connect to node C. Node F will connect to node D. These three nodes will form the third layer of the network.
**4.** Node G will be connected to node E, forming the fourth layer of the network. However, since the maximum number of layers allowed of the network has been configured to 4, node G will become a leaf node to prevent the formation of any new layers.
### Select Parent Node
By default, ESP-MESH-LITE is self-provisioning, i.e., each node can autonomously select a potential parent node with which to establish an upstream connection. The self-selected parent node is called the preferred parent node. The criteria used to select the preferred parent node are intended to reduce the layers of the ESP-MESH-LITE network for better connectivity stability (see [Preferred Parent Node](#Preferred_parent_node)).
### Asynchronous Power-Up Reset
ESP-MESH-LITE network building may be affected by the order in which nodes are powered up. If some nodes in the network are powered up asynchronously (i.e., a few minutes apart), **the final structure of the network may differ from the ideal situation when all nodes are powered up synchronously**. Nodes with delayed power-up will follow the following rules:
**Rule 1**: If there is already a root node in the network, the delayed node will not try to connect to the router after powering up, even if it has a stronger router RSSI value. Instead, the delayed node, like any other idle node, will join the network by connecting to the preferred parent node. If the delayed node is the user-specified root node, it will connect directly to the router, and the source root node (not the user-specified root node, but only the root node logically selected by the Mesh provisioning) will be disconnected from the router as a child node of the new root node.
**Rule 2**: If an idle node is assigned a layer by the user, then it will not attempt to establish any upstream connections until it has found a parent node on the layer above the specified layer. The idle node will remain idle indefinitely until it finds a parent node that satisfies the layer it has specified.
The following example demonstrates the impact of asynchronous power-up on network building.
<img src="./docs/_static/Network_Construction_Example.png" style="zoom:60%;" />
<center>Example of Network Building (Asynchronous Power)
**1.** Nodes A/C/D/F/G/H are powered up synchronously and are all connected to the router. Node A has the strongest RSSI and is selected as the root node, while the other nodes are disconnected from the router and start scanning for potential parent nodes.
**2.** Once Node A becomes the root node, the rest of the nodes begin to establish upstream connections with their preferred parent nodes layer by layer, and eventually form a network with five layers.
**3.** Since nodes B/E have a power-up delay, they will not attempt to become the root node even if their router RSSI (-20 dB and -10 dB) are stronger than node A. Instead, these two delayed nodes will establish upstream connections with their corresponding preferred parent nodes A and C. After joining the network, Nodes B/E will both become intermediate parent nodes.
**Synchronous power-up**: If all nodes are powered up synchronously, node E (-10 dB) with the strongest router RSSI becomes the root node. The network structure formed at this point will be very different from the asynchronous power-up case.
### Loop Prevention, Detection, and Handling
A loop is a situation where a particular node establishes an upstream connection with its descendant nodes (nodes in the subnetwork of the particular node). The resulting loop connection path will break the tree topology of the Mesh network. ESP-MESH-LITE has some internal loop detection mechanism to prevent nodes from establishing upstream connections and forming loops with nodes in its subnetwork unexpectedly.
## <span id = "4">Manage Network</span>
**As a self-healing network, ESP-MESH-LITE detects and fixes failures in the Mesh network**. A failure occurs when a parent node with one or more child nodes is disconnected or the connection between a parent node and its child nodes is unstable. A child node in ESP-MESH-LITE will re-scan for a more suitable parent node and establish an upstream connection with it to maintain network interconnection. ESP-MESH-LITE can handle root node failures and intermediate parent node failures.
### Root Node Failure
For the root node, any change (connection or disconnection) in its child nodes will initiate a round of **candidate root node** selection process. If the root node is disconnected, the nodes connected to it (nodes on the second layer) will detect the root node failure in time. The nodes on the second layer will actively try to reconnect with the root node. However, after several failed attempts, the latest candidate root node on the second layer will connect directly to the router and become the new root node, and the rest of the second layer nodes will establish upstream connections with the new root node (or with the neighboring parent node if out of range).
If the root node and the nodes on the lower layers (e.g., root, the second layer, and the third layer) are disconnected at the same time, the node on the highest layer that is still working will re-scan for potential parent nodes after several failed reconnection attempts. If scanned, a new preferred parent node will be selected to establish an upstream connection. If not, it will connect to the router.
<img src="./docs/_static/mesh-root-node-failure.png" style="zoom:60%;" />
<center>Self-healing for Root Node Failure
**1.** Node C is the root node of the network. Node A/B/D/E is the second layer node connected to node C. Node B is selected as the candidate root node because it has the strongest RSSI.
**2.** Node C is disconnected. After several failed reconnection attempts, the candidate root node on the second layer connects to the router and the other nodes start disconnecting from the source root node.
**3.** Node B is selected as the root node and begins accepting downstream connections. The remaining nodes on the second layer, Nodes A/D/E, establish upstream connections to Node B. Therefore, the network is now restored and can continue to operate normally.
Notes
If all nodes except the disconnected root node are not allowed to be Level 1, self-healing cannot be performed.
### Intermediate Parent Node Failure
If an intermediate parent node is disconnected, the child node that is therefore disconnected from it will actively try to reconnect with that parent node. After several failed reconnection attempts, each child node starts scanning for potential parent nodes (see [Beacon Frame](#Beacon)).
If there are other available potential parent nodes, each child node will choose a new preferred parent node respectively (see [Preferred Parent Node](#Preferred_parent_node)) and establish upstream connections.
The following example shows the network self-healing from an intermediate parent node disconnection failure.
<center>Self-healing from Intermediate Parent Node Failure
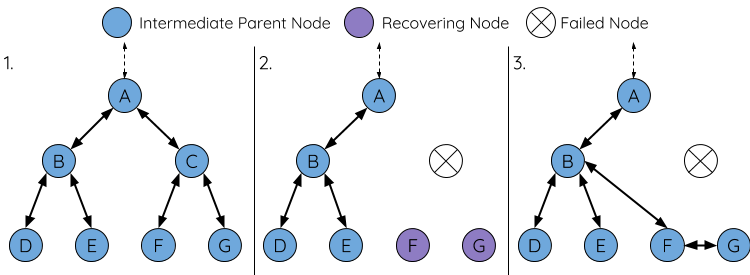
**1.** There are nodes A to G in the network.
**2.** Node C is disconnected. Node F/G detects the disconnection failure of node C and attempts to reconnect with node C. After several failed reconnection attempts, node F/G will start selecting a new preferred parent node.
**3.** Node G remains temporarily idle as no parent node exists in its range. Node F has two nodes, B and E, within its range, but node B is selected as the new parent node owing to the higher layer it is on. After node F is connected to node B and becomes an intermediate parent node, node G will connect to node F. Thus, the network has been recovered, but the structure has been changed (with one more layer added).
Notes
If the layer of a child node has been specified, the child node will not select a node on a higher layer as a potential parent. For example, if node G is specified to be Level 3 only, then it will not attempt to connect to node F. In this case, node G will remain idle indefinitely until a suitable secondary node is scanned.
### Root Node Switching (Self-Reference)
There are two major ways for automatic root node switching, one is a **Fusion** scenario triggered by multiple devices connected to the router at the same time (see [Automatic Root Node Selection](#Automatically_select_the_root_node)).
In another case, for Mesh routers with the same SSID Password, if the root node is connected to Router A, the whole Mesh network is then hosted under Router A. If Router A is accidentally disconnected, the entire network loses Internet access. At this time, all nodes enter **Self-Reference** mode, once finding the Mesh router B with the same SSID password, the node will refer itself to the root node with its MAC address and router RSSI. The root node selects and notifies the best self-referred node, which then disconnects from the parent node to connect to router B. At the same time, the root node notifies its child nodes to re-scan for new potential parents, and start scanning as well.
## <span id = "5">Data Transmission</span>
Each node in ESP-Mesh-Lite enables the LWIP stack and can be treated as a device directly connected to the router, which can independently invoke network interfaces such as Socket, MQTT, HTTP, etc., on the application layer.
### Bidirectional Data Flow
The following figure shows the various network layers involved in bidirectional data flow during ESP-MESH-LITE leaf node network communication.

<center>ESP-MESH-LITE Bidirectional Data Flow
## <span id = "6">Performance</span>
The performance of an ESP-MESH-LITE network can be evaluated based on multiple metrics, such as:
**Provisioning time**: the total time required to build an ESP-MESH-LITE network from scratch.
**Repair time**: the time required from the time the network detects a node disconnection until the appropriate action is performed (e.g., generating a new root node or establishing a new connection, etc.) to repair the network.
**Per-Hop delay**: The delay experienced by data per wireless hop, i.e., the time it takes to send a packet from a parent node to a child node (or from a child node to a parent node).
**Network node capacity**: the total number of nodes that the ESP-MESH-LITE network can support at the same time. This metric depends on the maximum number of downstream connections that a node can receive and the maximum number of layers allowed in the network.
Below are some common performance metrics for the ESP-MESH-LITE network:
- Provisioning time: < 60 seconds
- Repair time
Root node disconnection: < 50 seconds
Child node disconnection: < 45 seconds
- Per-Hop delay: 8 to 12 ms
**Notes**
- The test conditions for the above performance metrics are shown below.
- Number of test devices: **50**
- Maximum number of downstream connections allowed: **6**
- Maximum number of layers allowed: **6**
- The throughput depends on the number of devices and layers in the network, and is also affected by the interference from surrounding environment.
- Users should note that the performance of the ESP-MESH-LITE network is closely related to the network configuration and operating environment.
## <span id = "7">Difference Between ESP-MESH-LITE and [ESP-MESH](https://docs.espressif.com/projects/esp-idf/en/v4.4.2/esp32/api-guides/esp-wifi-mesh.html)</span>
- ESP-MESH-LITE saves more memory space compared to ESP-MESH, but ESP-MESH's self-provisioning and self-healing features are relatively better.
- The way of parent node automatic selection is different between ESP-MESH-LITE and ESP-MESH.
- ESP-MESH: When all devices are idle after power-up, the root node is selected according to the RSSI, and then the root node is connected to the router.
- ESP-MESH-LITE: By default, the device that is powered up first after provisioning is selected as the root node. If more than one device are powered up at the same time, after all devices are connected to the router, all devices start to broadcast the router RSSI, and the one with the strongest RSSI is selected as the root node. The rest of the nodes disconnect from the router and re-scanning for the new parent node.
- Only the root node in ESP-MESH enables the LWIP stack, and all child nodes need to be forwarded through the root node if they want to communicate with the external network.
## <span id = "8">Migration Guides</span>
If you want to integrate the original project code with ESP-MESH-LITE, you only need to focus on the router connection operation during provisioning. Instead of calling esp_wifi_connect() directly to connect, you need to call esp_mesh_lite_connect().
Take Wi-Fi Provisioning as an example. After receiving the router SSID and password, call esp_mesh_lite_connect() to let ESP-MESH-LITE internally scan for a suitable parent node. If it exists, ESP-MESH-LITE will connect to the preferred parent node; if not, it will connect to the router and act as the root node.
```c
/* Event handler for catching system events */
static void event_handler(void* arg, esp_event_base_t event_base,
int32_t event_id, void* event_data)
{
if (event_base == WIFI_PROV_EVENT) {
switch (event_id) {
case WIFI_PROV_START:
ESP_LOGI(TAG, "Provisioning started");
break;
case WIFI_PROV_CRED_RECV: {
wifi_sta_config_t *wifi_sta_cfg = (wifi_sta_config_t *)event_data;
ESP_LOGI(TAG, "Received Wi-Fi credentials"
"\n\tSSID : %s\n\tPassword : %s",
(const char *) wifi_sta_cfg->ssid,
(const char *) wifi_sta_cfg->password);
#if CONFIG_MESH_LITE_ENABLE
esp_mesh_lite_set_router_config(wifi_sta_cfg);
esp_mesh_lite_connect();
#else
esp_wifi_set_storage(WIFI_STORAGE_FLASH);
esp_wifi_set_config(ESP_IF_WIFI_STA, (wifi_config_t*)wifi_sta_cfg);
esp_wifi_set_storage(WIFI_STORAGE_RAM);
esp_wifi_disconnect();
esp_wifi_connect();
#endif /* CONFIG_MESH_LITE_ENABLE */
break;
}
}
}
}
```
**Notes**
For specific provisioning code modification, please refer to [Wi-Fi Provisioning](https://github.com/espressif/esp-mesh-lite/blob/master/examples/rainmaker_led_light/components/app_wifi/app_wifi.c).
Except for the provisioning connection part, the rest of the network applications (Socket, MQTT, HTTP, etc.) do not need to be modified.
## <span id = "9">Further Notes</span>
- Data transmission is encrypted using Wi-Fi WPA2-PSK (password required for SoftAP)
- Communication between nodes within a Mesh network can be encrypted with AES128 using `esp_mesh_lite_aes_set_key` (see [Mesh-Lite API Reference](https://github.com/espressif/esp-mesh-lite/blob/master/components/mesh_lite/include/esp_mesh_lite_core.h))
The router and Internet icons used in the images in this document are from [Smashicons](https://smashicons.com/) of [www.flaticon.com](https://smashicons.com/).
Links
Supports all targets
License: Apache-2.0
To add this component to your project, run:
download archive
idf.py add-dependency "espressif/mesh_lite^0.1.1"
Stats
-
Archive size ~ 1.58 MB
-
Downloaded in total 7.1k times
-
This version: 40 times